Friday, July 11, 2008

A Turkey and a Dream


As with all projects, there is a momentous moment that defines the start. This one happened to involve Thanksgiving and the anual Turkey Cook Off. Mine on the right was cooked in the conventional Trash Can approach, while my brother opted to use the indoor appliance more commonly known as the Maytag Oven. The verdict is still pending with the committee. Once the tetracyclin had settled into the muscles and brain, a great idea was born to build the Cedar Strip Canoe.
Dear old Dad was in town and offered to let us use his brand new Retirement Van (Honda Odessy) to transport the long boards (18 feet). This special moment involving the Thanksgiving "Man Outing" was fun and enjoyable.
Thus the 7 month process had begun.

Steaming in Mama's Kitchen


From the taste of turkey, we move to the next cooking phase. (No we are not cooking meth). The day after Thanksgiving we purchased 7 boards of clear cedar, each 18 feet long in length. Does not sound like much, but comes to a bill of about $550.00 in product. (Yes you do not want to make a cutting mistake, measure 5 times and cut once).
What you are seeing in this photo is the steaming of strips of cedar and ash so that they can be bent to make the stern and bow peices. This was a new process for me to learn and quite interesting. After they are heated and steamed for about 15 minutes, you can pull them out and quickly clamp them into place, in order to hold their shape. Yes, my wife was gone when I desecrated the kitchen in this manner.

12/6/07 Setting the Stations on the Strongback and shaping the cedar stems


This step of the process involved setting up the strongback which supports all of the stations. These stations were shaped when my brother built his cedar strip canoe last year. We had to re-align them and ensure they were centered accurately. This detail is critical to the boat being true. Each of these stations helps give the shape and hold the stapled peices of cedar in place while the glue dries between each joint.
The last photo, you can see me shaping the cedar stem into a "V" shape. I am using the spoke shave and experiencing the joy of handtools like this for the first time. Kind of neat to use the same tool, that was revolutionary 1oo's of years ago.


Putting the meat on the bones. 12/10/07


Here you can see further progress in putting the cedar strips onto the form or "rib cage" of the boat. Each peice is stapled and glued into place. Detail being focused on color matching, as well as having a tight fit. The work actually goes fast. Tying in the ends is the critical peice.


The After Christmas Football. 12/26/07


What better way to cure the after Christmas Blues, than fill in the "football" on the bottom hull of the canoe. I found that the 8 hour drive,back from NY helped me to work through the details of this detailed process. Lots of chiseling and precise cutting. She is starting to look like a real boat.

Gluing on the Outer stems 1/1/08 Happy New Year


Today 1/1/08 I glued on the outer stems. These are made from ash and where steamed into shape. They are epoxied into place, with liberal use of epoxy to fill any of the gaps. Mark is also seen exhibiting his planing skills. Oh the smell of fresh cedar.

Sanding and Shaping the Outer Hull


Sanding and scraping the outer hull took lots of time and energy. The tools primarily used invovled a hand plane, and spoke shave. These are the old school utensils that stand the test of time. At this point, I also removed the screws that held the stems in place. As you see the canoe here, it contains no metal! It is only held together by glue and epoxy. It is now waiting for the fiberglass and epoxy to give it strength.
I did not have photo's of how I shaped the inner hull. That was fairly detailed. I was glad to have purchased a special contoured scraping tool that made this much easier.
(Click on "Older Posts" below to be brought to next page)

Applying the Outer Hull Glass and Epoxy


This was a time consuming day of applying the Fiberglass and West System Epoxy to the cedar hull. The shop was cleaned and the process started. I got to my brother's house at about 6:00am to wake him up and force him into our attractive Tyvek suits and respirators. In addition to safety from exposure to the epoxy, we made quite the fashion statement. This day involved 3 applications of epoxy with enough time to cure in between. Started and 6:00am and done about 18 hours later. Hard work, but satisfying.


Glassing the inner Hull


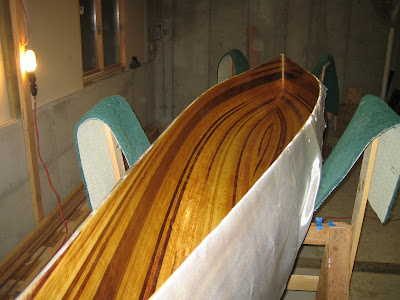
Here you see the canoe upright. The inner hull has been scraped and sanded. I have just completed putting 2 coats of epoxy on the inner hull. The excess fiberglass is left to hang and catch any drips. It later is cut away.
The last process prior to moving out the basement. From here we moved the canoe to my house and garage. The next steps involve lots of sanding and detail work with attaching trim and seats. I opted for Cherry trim with a Curly Maple accent peices on the bow and stern. You can smell the progress!

The Final Reward


The final reward and test float. After the fresh coat of Spar Varnish had dried, she was ready for the final test. We proceeded over to where it all began (the site of the Turkey Cookoff) for the maiden voyage. Sweet Reward!!